


The knowledge tree is the hierarchical structure of elements (as displayed in the middle of the contents window). The tree does not take part in learning and does not affect the efficiency of the learning process. Many beginners believe that a good structure of the tree will help them prioritize their learning; however, you should not begin your adventure with SuperMemo from studying the tree! You should begin from mastering the ABC. In the beginning, your learning workload will not be high and mixed-up material belonging to different subjects may only enhance your initial enthusiasm. Remember: variety is the spice of life. Mixed up repetitions are the norm; not an exception in SuperMemo!
Once you master the basics of SuperMemo, you can benefit from using the knowledge tree by keeping your various learning subjects separate. Occasionally, it may help you handle a single subject as a whole (e.g. delete or postpone your Visual Basic branch once you decided to go Java).
An exemplary knowledge tree is displayed below. Building and modifying the tree in SuperMemo is easy, yet it causes lots of confusion among the beginners. This is why understanding the tree terminology can be useful. This overview will help you build your own tree in minutes
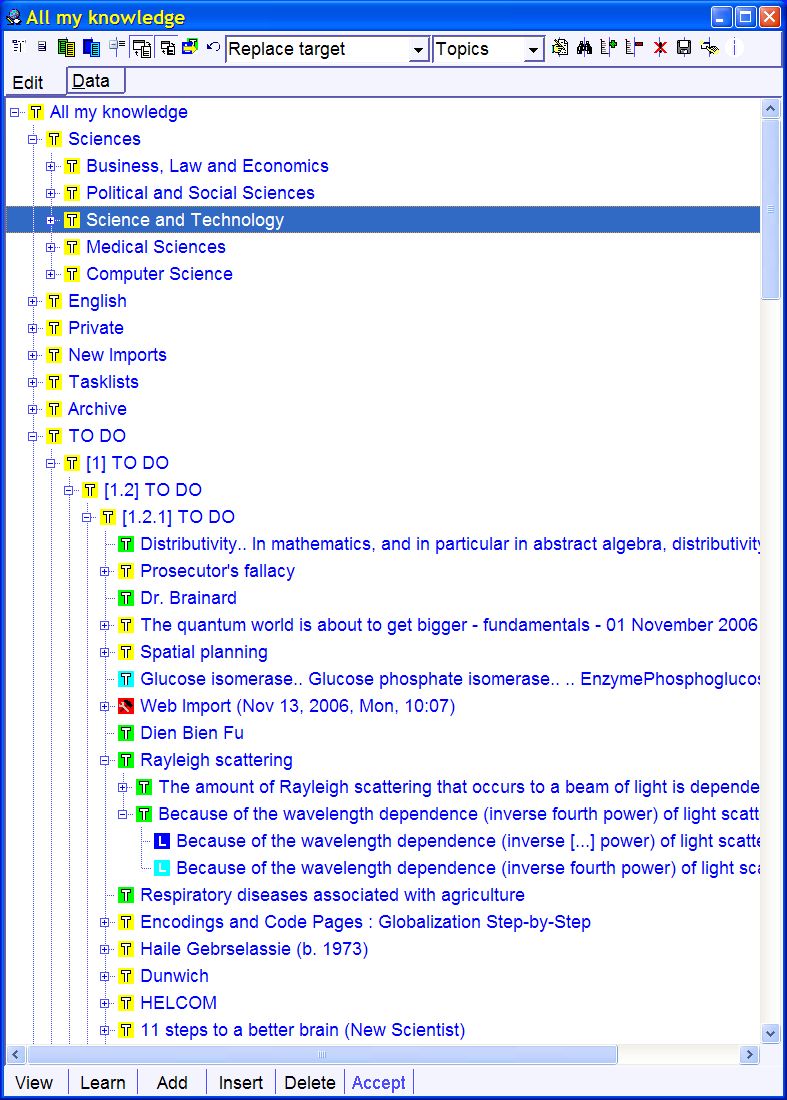
Terminology: tree, root, branches, children, siblings, parents and leaves
The tree presented above begins with the root named All my knowledge at the top. There are five branches growing from the root: Reading list, Private, SuperMemo, English and Sciences (there are more branches under Sciences that are not visible in the picture). All branches growing from a given branch are called children. The branch Sciences has five children displayed in the picture:
- Business, Law and Economics
- Political and Social Sciences
- Technology and Sciences
- Medical Sciences
- Computer Science
All the branches listed above are their own siblings. For example, Medical Sciences are a sibling of Computer Science. On the other hand, Sciences is the parent of all the siblings listed above.
Further down the tree structure, there are
children of Computer Science such as History of Computing, Foundations
of Computer Science, Software, Programming, Internet,
etc.
At the very bottom of the structure there are leaves, i.e. children that do not
have further children.
Please note that the root, branches, children, leaves, etc. are all elements in SuperMemo. This means that you can view them in the element window and fill them out with components (such as texts, pictures, sounds, etc.). To view a given element in the element window, select it and choose View at the bottom of the contents window
Status icons: pending, memorized and dismissed
All branches in the tree are marked with small icons that indicate the status and type of a given element in the learning process:
-
Red-arrow icons indicate tasks (e.g. The ARPA net story)
-
L-plate icons indicate items (e.g. When was FTP developed)
-
Folded-sheet icons indicate topics (e.g. All my knowledge)
-
Yellow icons indicate dismissed topics or items. Those elements do not participate in repetitions. Dismissed items are indicated by yellow L-plate icons, while dismissed topics are indicated by yellow folded-sheet icons
-
Blue icons indicate memorized items (e.g. question-answer items that take part in repetitions)
-
Sky blue icons indicate pending elements (i.e. elements awaiting memorization or review). Pending topics are indicated by sky-blue folded-sheet icons, while pending items are indicated by sky-blue L-plate icons
-
Green icons indicate topics in the review process (e.g. articles that take part in incremental reading)
Note that:
- memorized - elements marked with a blue L-plate or green topic icon have already been memorized and take part in repetition and review
- pending - elements marked with a sky blue L-plate or topic are waiting for review in the pending queue. Once they are memorized, their icon will change to dark blue (for items) or green (for topics)
- dismissed - elements that do not take part in the learning processed are marked yellow. Usually they serve as holders of other items or branches (e.g. Internet, World Wide Web, etc.) or they are kept only as reference or comment
The plus sign to the left of the element indicates that the element has children. You can see the children when you click the plus sign. The minus sign to the left of the element indicates that the element with children can be collapsed. When you click the minus sign, all children will disappear from view and the minus sign will be replaced with a plus sign
Building the tree
There are two basic methods of building a knowledge tree:
- Using the contents window - you can use operations such as Add, Sibling, Insert or Delete to build the tree directly in the contents window. Once you build a tree or its part, all elements will remain empty, i.e. you will have to fill them out with components (e.g. by means of templates)
- Using categories - if you add a large number of similarly looking items to a single branch, you will rather want to use categories which greatly simplify this process. Categories automatically use templates to make sure that your elements are filled out with components of a desired look, number, size, etc.
Once you create a tree, you can always modify it using drag&drop operations
Building the tree in the contents window
If you build a small collection with a complex tree structure, you may prefer to use the contents window operations to build the tree:
- If you choose Add, a new child will be added to the currently selected element (please click Add several times to see how this option works)
- If you choose Sibling, you will add a new sibling of the currently selected element (i.e. you will add a new child to the parent of the currently selected branch). Note that there is only one root of the tree and you cannot add siblings to the root
- If you choose Insert, you will also add a new sibling, but the new sibling will be inserted in the place of the currently selected element. The selected element will move one position down. As in the case of Sibling, you cannot insert a new element in the place of the tree root
- If you choose Delete, you will delete the currently selected branch (i.e. the selected element and all its children)
Once you add an element or a few elements, you can modify their titles. For this purpose select the element and click it to start editing the title. You can also choose View and press Alt+T to conveniently edit the title in the element window. If you fill out elements with texts, SuperMemo will automatically generate titles of your elements
If you would like to change the structure of the tree, read below: Modifying the tree using drag&drop operations
Building the tree using categories
Categories are portions of the knowledge tree
that use the same look of elements and usually belong to a single subject. For
example, you can define a category called Biology and keep there all
items related to biology.
If you select a given category on the toolbar, each
time you press Ctrl+A, you will add a new item
to the selected category. You will use this method only then if you want to add a large number of items to
the same place of the knowledge tree. Later you can use drag&drop
operations to modify the tree or use Element
parameters to move an element between categories.
For more details, read: Using categories
Modifying the tree using drag&drop operations
If you would like to modify the structure of the tree, you can do it most easily using drag&drop operations in the contents window
Modifying a tree is as simple as dragging a branch from one location to another (in the contents window or between two contents windows). To drag a branch, click it with the mouse, hold down the left mouse button, move the mouse to another branch (still holding the mouse button) and release the left button once you are over the target branch. The dragged branch will be moved to the target branch
It is important to know that there are several dragging modes. Depending on which mode is selected, the dragged branch will be moved in one of several ways. You select the modes using the drag&drop combo box on the edit toolbar in the contents window (the one marked with Replace target at the top of the edit window displayed above). There are five dragging modes in the contents window:
- Replace target - in this mode, if you drag a branch onto another branch, the dragged branch will replace the target branch and the target branch will move one position down
- Add as last child - the dragged branch will be moved to become the last child of the target branch (naturally, you cannot drag a branch to any of its descendants as it cannot become its own child)
- Add as last sibling - the dragged branch will be moved to become the last sibling of the target branch
- Transplant children - all children of the dragged branch will become the children of the target branch, but the dragged branch will not move
- Transplant partly - same as Transplant children with this difference that you will be asked how many children you want to transplant. If you choose a number N, only the first N children of the dragged branch will be transplanted (auto-sorted tree will behave in the same way as an unsorted tree, i.e. element will be transplanted in their physical order; not in the sorted order)
Please note that if you change the dragging mode, the change will affect all dragging operations in the future, even if you quit SuperMemo
If you would like to open a second contents window and drag branches between two panels, click the blue Contents alignment icon on the contents window toolbar
Frequently Asked Questions
(Richard D., USA, Jun 11, 2001)
Question:
How can I easily move elements between two deeply-nested branches in the contents tree? I could not find copy, cut and paste in the contents window
Answer:
The most convenient way is to open the second contents window (use the blue Content alignment button) and use drag-and-drop operations
You can only move single elements between branches or transfer a selected number of adjacent children (#6134)
(Mark Yang, Saturday, August 25, 2001 12:33 AM)
Question:
How to move more than one elements from one branch to another? It does not allow me to do multiple selections
Answer:
Content tree does not allow of multiple selections. You can either drag and drop individual elements or transfer adjacent children with
Transfer partly